ShopDreamUp AI ArtDreamUp
Deviation Actions


Description
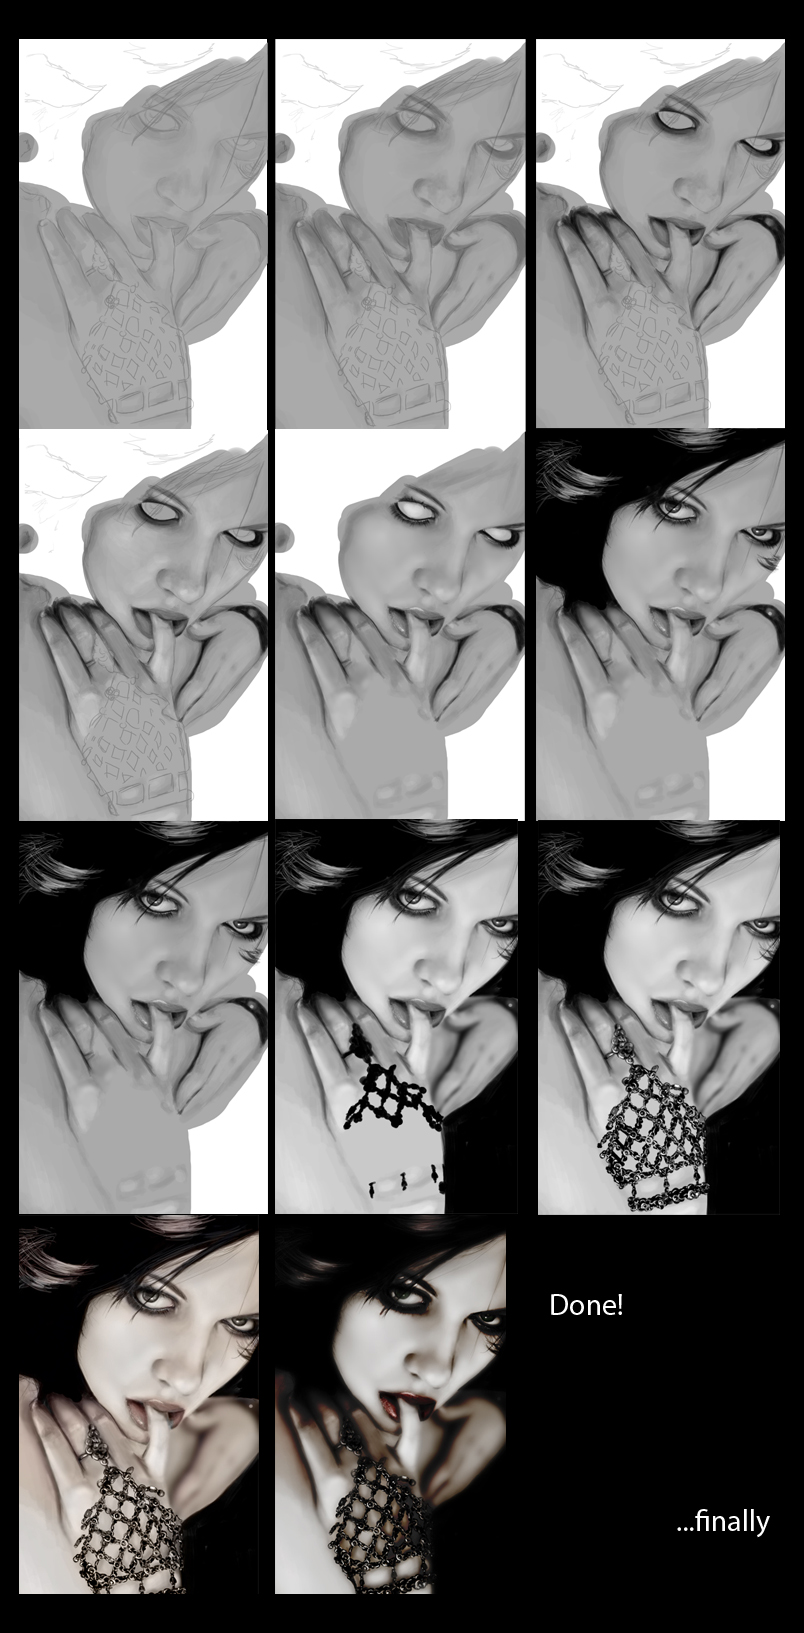
1) I started out with a basic sketch, took it to a low opacity and then underneath the sketch layer, flooded a nuetral gray where skin would be. I choose to work in b/w first, it makes it easier for me to see where shadows should be going when I don't have a reference - not to mention colors are hard to work with in the beginning stages for me. Next, I took a gray that was two-three shades darker and began laying down the very beginning of shadow. Now is the time not to worry about being perfect.
2) I begin laying down a shade that's about two shades darker than my first set of shadows. I work with many different shades so that I can get a gradual flow and it's less blotchy. I work more on the three fingers than anything else, the face doesn't have many dark shadows on it (except for the eyes and the lips).
3) I take a drastically darker color - but not black - to accentuate the contrast. I work mostly on the eyes, lips and fingers - now is the time I usally build up for smaller details.
4) Ah, highlights. These are very important, you need dull highlights and sharp highlights to make your piece look realistic/3d. It really brings you out of the flat-color stage. Highlights are found everywhere, even in the darker places on the face/body. In this painting, the nose and hand were the most prominent in their highlights. I used two shades darker than white to do the basic highlights, then went back with pure white to tip off the nose/hands.
5) I know it looks like a huge jump, but it's really not. I went through and guassian blurred the skin (using the laso tool and the feather option) to blend it. Usually I don't do this, but in this case, my ref had very smooth/diffused skin. Next, I put in the white of the eyes with white and took a small brush to do the beginning detail of the eyes (I.E the eyelashes/the reflections off the makeup etc). Then, I added shine/a bit of texture to the lips. You'll notice that I also have my outline hidden in this snapshot, this is to see my brush and the details easier.
6) I took solid black and filled the background. I also took a very small brush and painted in the hair - finally. Hair is one of the last things I do, it's crucial to the shape of the face so I try not to wait too long though. I blocked in the irises/pupils and gave them slight detail with a custom brush I use for freckles.
7) I used photoshops diffuse filter to brighten the whole thing and give it a closer look to my ref.
8) I start blocking the bracelet. This actually took me longer than I thought it would, I tried desperately to figure out how the bracelet was linked together but the pattern seemed to change so much that it was impossible for me to guess.
9) Finally I finish blocking the bracelet and added shine using a small brush in a light gray.
10) I block in the color that I'm going to use in a new layer and set the layer to color to preserve the b/w details. I also widened the left eye to look more like the ref. I continue adding small details in the eyes especially.
11) I add more saturation to my colors, flatten all my layers, duplicate the back ground and set it to color burn - I love that setting. Anyway, that's it!
Image size
804x1633px 516.15 KB
Make
Canon
Model
Canon EOS DIGITAL REBEL
Shutter Speed
1/25 second
Aperture
F/4.0
Focal Length
25 mm
ISO Speed
400
Date Taken
May 23, 2005, 11:43:02 PM
© 2008 - 2024 AliceInUnderland
Comments43
Join the community to add your comment. Already a deviant? Log In
wonderful !!!!! <3 _ <3